
This workspace 5 of the default Ableton Live profile presents an alternative Session View workflow with actions and functions as well as editing tools, but with less focus on clips than Clip Launch Mode.
Some of the functionality is close to that of Clip Launch Mode, but there are more actions on pads with a more immediate access. Also, this workspace is again fully customizable.
Select a Scene and Play It
In Loupedeck CT:
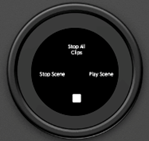 Use the first wheel to select a scene (rotation action) and touch its Play Scene action to play it. You can also use the top right Select Scene dial to select a scene AND play/stop it: pushing down on the dial triggers a scene, and pressing again on the same scene stops it. Note that this does not stop the song; for that, there is an action on the wheel. There is also a Stop all Clips action (on the wheel in this workspace), which stops all currently playing clips.
In Loupedeck Live:
Use the top right Select Scene dial to select a scene AND play/stop it: pushing down on the dial triggers a scene, and pressing again on the same scene stops it. Note that this does not stop the song; for that, see the top right dial on dial page 2 (swipe the page up or down to access it).There is also a Stop all Clips action on dial page 2, which stops all currently playing clips.
TIP: For convenience, both scene selection (rotation action) and play/stop scene (press action) are currently on the same dial – even though you only see the “select scene” text. You can easily combine rotation and press actions on the same dial – in order not to use two dials for related actions. If you wish, you can separate these, of course.
”Play Next Scene” Workflow in Loupedeck CT
 If you wish to tell Ableton Live to play the next scene, the easiest way is to move the selection to the scene area (use CT arrows or click with a mouse) and just use the CT Enter button. This will always trigger the highlighted scene and conveniently move the selection to the next scene. This way you can use Enter to trigger the next scene easily whenever you want.
TIP: Selecting a scene with the Select Scene dial and playing it with the same dial also highlights a scene.
Playing a Clip
Loupedeck CT:
You can play clips in this mode, too: use the CT arrow keys and/or or the second wheel tool to move the clip selection and just press Enter on CT to play a clip. There are also Play Clip and Stop Clip actions on the pads. 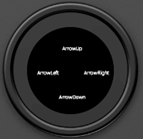
This wheel also has scene selection as its rotation action, so using this wheel it is easy to select and play the the clip you want.
Recording a new clip / into existing clips. Fo r clip recording, refer to recording functions on the manual section Workspace 1. The third wheel has track select as its rotation function and arming is as touch actions on the wheel.
Loupedeck Live:
You can play clips in this mode, too: use the arrow key pads on touch pad page 2 to move the clip selection, and Play Clip on the same page to play the highlighted clip. There are also Stop Clip and Stop All Clips actions on the pads.
Duplicate a Scene
Use Duplicate to make a duplicate of the selected scene. For scene duplication to work correctly,
selection must be in the scene field (i.e. use CT arrow keys for your mouse or dials in Live; selection is also automatically on scenes after launching a scene). This can also be used to duplicate clips by highlighting a clip instead of a scene.
Delete a Scene
Delete Scene removes the currently selected scene.
Create an Empty Scene
Create Scene creates an empty new scene below the currently highlighted scene.
Capture and Insert Scene
This action makes a new scene out of all clips that are playing when the action is triggered.
The new scene is created below the current scene selection. This is very handy for being creative: when you use Session View as a sketchpad to jam and play clips here and there, it is convenient to create a new scene out of all currently playing scenes that “makes sense” and captures your current idea/loop/theme.
Capture MIDI
This function allows you to create a new clip out of what you just played or add information to an existing clip, if selected.
Mute Functions
 In Session work (e.g., when performing a song live from Session), muting is required often.
You will see Mute and Mute track/clip on the pads. Mute track always mutes a track regardless of where your selection is, but general Mute can be used to mute either, depending on what is selected: if track header is selected, track is muted, but if a clip is selected, it mutes the selected clip.
TIP for CT: Use the track select wheel, in conjunction with Mute Track pad, for convenient track muting.
TIP for Live: Use the track select dial (dial page 2), in conjunction with Mute Track pad, for convenient track muting.
Crossfader

For doing A/B crossfading for your tracks in Session View, there is a dial control for crossfader.
TIP: Pushing down on this dial resets the crossfader to default state, i.e., the middle. This is how all dials controls work: pushing resets to default.
Global Quantization
As quantization plays a big role in triggering scenes, global quantization is conveniently set with a dial in this workspace.
PROTIP for CT: While Fn + E quickly switches between Arrangement and Session, it also returns the focus from the clip view back to the track or the clip space. In other words, if your focus (the vertical playhead) is in MIDI note editor or audio clip and you want to quickly return it to track or clip space, double-tap Fn + E.