Ableton Live - Clip Parameter Mode
Clip Mode allows for editing of clip parameters. This mode works for both Arrangement and Session View clips. What is seen on Loupedeck device in this mode varies depending on whether an audio clip or a MIDI clip is currently selected.
Due to the way this dedicated dynamic workspace has been built, it is not customizable. Some of the actions are executed differently, depending on whether you are using Loupedeck CT or Live.
 First, click on a clip to reveal actions for pads and dials. Use either the second wheel or the Skip ←→ dial of this workspace to change clip selection on Arrangement when clip view is open (if you use the Skip ←→ dial, make sure to not highlight the top bar of a clip, or else the dial will move the clip).
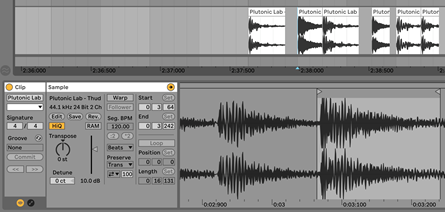
Moving the playhead this way selects the clip whose parameters you are able to tweak, and you will always see the parameters of the currently selected clip in the bottom bar in Live (note that with this workflow you don’t necessarily have to click on a clip as long as you have clicked of Arrangement once).
E.g., in the picture, moving the playhead between the six audio clips using the second wheel rotation or the Skip ←→ dial allows the user to quickly set different gain and transpose values for the clips. The clip you will see is based on what clip area the playhead is currently in.
In Loupedeck CT; If you want to zoom in on a clip, first click on the clip view and then use the first wheel. If you click on Arrangement, the first wheel zooms Arrangement.
AUDIO CLIP - dials
Color
Can be used to scroll through the color selection to assign a new color to the clip.
Start/end marker
When looping is enabled, these controls can be used to set the clip’s start and end points.
Clip/loop start
When looping is enabled, this controls the starting point of the loop brace.When looping is not enabled, this controls the starting point of the clip.
Clip/loop end
When looping is enabled, this controls the end point of the loop brace. When looping is not enabled, this controls the end point of the clip
Clip/loop positionThis sets the loop position.
Gain
For setting the gain of the clip in 0.1 dB increments.
Pushing down on the clip gain resets it to zero.
Semitone
For adjusting the sample pitch transposition in semitones.
Detune
For adjusting the sample pitch transposition in cents.
AUDIO CLIP – touch pads
Loop on/off
Enables and disables the clip’s looping. Set its length and position with dials.
Warping on/off
Enables and disables the clip’s warping.
Warp mode
For changing the clip’s current warping mode. Only works when warping is active.
Load to RAM
Loads the audio of the clip into your computer’s memory instead of reading it in real-time.
This may lessen the hard disk load. Useful if you are getting lots of hard disk overloads (indicated by the “D” symbol on top right of Live).
MIDI CLIP - dials
Color
Can be used to scroll through the color selection to assign a new color to the clip.
Start/end marker
When looping is enabled, these controls can be used to set the clip’s start and end points.
Clip/loop start
When looping is enabled, this controls the starting point of the loop brace.
When looping is not enabled, this controls the starting point of the clip.
Clip/loop end
When looping is enabled, this controls the end point of the loop brace.
When looping is not enabled, this controls the end point of the clip.
Clip/loop position
This sets the loop position.
MIDI CLIP – touch pads
Loop on/off
Enables and disables the clip’s looping. Set its length and position with dials.
Crop
Crop function deletes material that is not inside the current clip loop region.
Duplicate loop
This action duplicates the loop and doubles its duration.