Select track / Play song dial
Upon entering this workspace, you will see a dial on top right that is used to select a track, but it also has a Play/Stop action as its press function.
PROTIP! Mouse is a nice companion to Live. For example, when mixing a large multitrack project and adjusting track levels, it’s a very efficient workflow to use one hand to mouse-click on a desired track – or use this dial to select a track – and then use the other hand to adjust track levels with the top-left track level dial.
Track volume and panning
![]()
 Choose a track, and then you can use Track Volume and Track Panning to set the level and pan position of the desired track. Note that with these controls, too, pressing down on a dial returns the parameter to its default value (level returns to zero, and panning returns to center). These can be used for audio and MIDI tracks as well as return tracks.
Master volume  On bottom left, Master Volume dial control can be found.
Cue level  There is a dial for cue level. Unlike in Ableton Live, setting Cue level while auditioning samples from the browser does not the playback of the sound that is being previewed.
Mute and solo tracks
Muting and soloing a track is as easy as selecting a track and tapping Mute and Solo pads.
TIP! If you do a lot of soloing and muting, you could even assign mute and solo to the track select dial, so you could use the same dial to select a track and then mute or solo it by pressing down on the dial!
Send controls  Send controls (for sending signal to Return tracks) are on the second dial page. The default profile has controls for six sends (A–E). You can have more than that: Loupedeck app will allow you to add 12 sends to your profile (they can be found for dials under Adjustments→Track folder in the Setup software).
TIP! All mixers controls also work inside Drum Rack: you can use the Select Track dial to scroll inside the Drum Rack and operate the mixer controls. Remember that Live is a great companion to your mouse, and it is also fairly convenient to select the desired track with your mouse and then use Live for desired actions (e.g., solo). Even sends work inside Drum Racks if you have created your own chains inside the Drum Rack.
Get dubbing!
Routing and monitoring
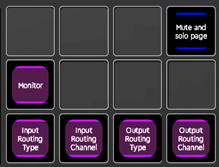 In addition to offering a monitoring function, the second touch page on this workspace offers functions for routing and monitoring. You can adjust the following things:
• Input Routing Type. On audio tracks, this toggles between sources that are available for the Audio From field. Here you can choose from an external input source (if it has
been set in Audio settings in preferences), resampling the audio engine, and all available audio tracks as well as Return tracks.
• Input Routing Channel. If you are recording from external input, this chooses from external input tracks (e.g., the input tracks that your audio interface has to offer). If you are recording from any of Live’s tracks, this selector chooses from Pre FX, Post FX, and Post Mixer.
• Output Routing Type. Use this to set the output destination of the track: master, an audio track in your project, Sends Only, and External Out.
• Output Routing Channel. If your audio interface has several outputs (and they are activated in Audio settings in preferences), this control toggles between all the available outputs.