Creating your own icons is a lot of fun and really makes your profiles stand out! At the moment icon packs (to the icon library) can be created manually - with these instructions you will have your icons easily available when ever you need them!
First part: Creating folder structure and adding metadata files
- Open following line in file browser:
- Windows: %LocalAppData%\Loupedeck\Media\Icons
- macOS: ~/.local/share/Loupedeck/Media/Icons
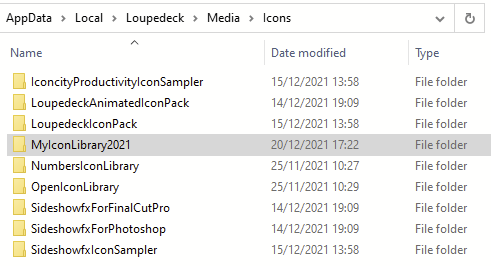 Create a folder (containing only)
- Latin letters or numbers
- Starts with a letter
- Example: MyIconLibrary2021
- Copy your icons to that folder
- (Within your new icon folder) create a subfolder named "metadata".
- Download LoupedeckPackage.yaml and move (or copy) the file into the previously created "metadata" folder
- Add an icon to metadata folder with the following attributes:
- PNG-format,
- long edge minimum of 32px (does not need to be square), and
- named: Icon256x256.png
Second part: Editing the icon pack metadata file
Open the LoupedeckPackage.yaml file, which you previously downloaded, in text editor
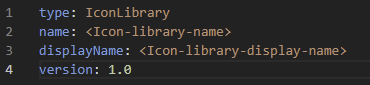 Type: IconLibrary, no changes needed
- Name: Replace <Icon-library-name> with the name of your icon library
- e.g., MyIconLibrary2021
- If Name is not exactly the same as your folder name: the icon pack will not appear in the icon library
- displayName: Replace <Icon-library-display-name> with the text you want to see in Icon Library UI
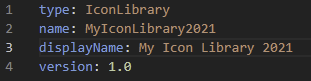
- e.g., My Icon Library for 2021
- Version: 1.0, no changes needed
- Save your LoupedeckPackage.yaml file
 (Re)start your Loupedeck software and check that everything looks as it should within the Loupedeck Icon Library
Tip 1! Create a link of your icon pack folder to your desktop to have an easy way of pushing more icons to the icon library!
Note! These instructions are ment for personal use only - if you have an icon pack for public distribution, please contact customer support for additional information!