NOTE! This article follows the default profile of Loupedeck+ for Lightroom Classic. All dials and buttons are customizable and therefor your own profile might be different.
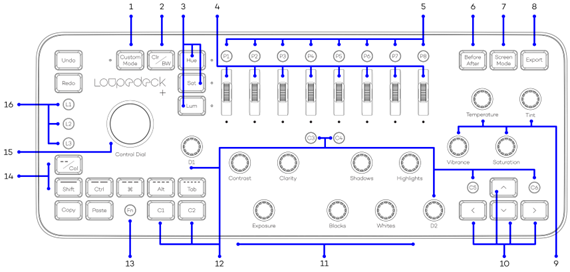
- Custom mode activates a 2nd layer of functions (Custom Mode Workspace)
- Toggles image between the Color and Black/White tones and activates B&W adjustment scrolls (4)
- Hue, Sat(uration) and Lum(inosity) buttons activate corresponding scroll adjustments (4)
- Separate color channel adjustments (activated by Hue, Sat and Lum buttons)
- Turn/rotate to adjust
- Press to reset the values
- Continuous rotation
- Configurable preset buttons
- Compare the “before” and “after” states of your photo
- Different types of Before/After modes can be assigned by using Loupedeck software
- Choose your Screen Mode (for example full screen editing)
- Export the photo/photos that you have selected in the filmstrip
- Remember to assign your own personal Export Presets to normal and FN-level!
- Whitebalance and saturation adjustment dials
- Turn/rotate to adjust
- Press to reset the values
- Continuous rotation
- Navigation buttons
- Basic dials
- Turn/rotate to adjust
- Press to reset the values
- Continuous rotation
- Customizable C1-C6 buttons and D1-D2 dials.
- Assign actions or adjustments that support your workflow
- Additional functions button (activates secondary controls: keep FN pressed down and press some other button or rotate a dial)
- Filter photos by ratings or color labels and toggle between the rating and color label or activate the Keyboard Modifiers mode (FN + --/Col)
- Control Dial for controlling multiple different functions, like brush and crop tool